Secure60 Collector
Overview
The Secure60 Collector is a service that ingests data from various log sources and automatically transforms it into the Secure60 Common Information Model (CIM). The collector normalizes and sends this data to your Secure60 Project.
Key Features
- HTTP/S and Syslog endpoints for ingestion
- HTTP polling for data extraction from third-party systems
- 40+ custom integration options (Kafka, AWS S3, Redis, Splunk HEC, Fluent, etc.)
- Automatic field normalization
- Scalable to hundreds of thousands of events per second
- Flexible deployment options (Docker, Cloud-hosted, or bare metal)
- Data Masking and privacy
Deployment Guide
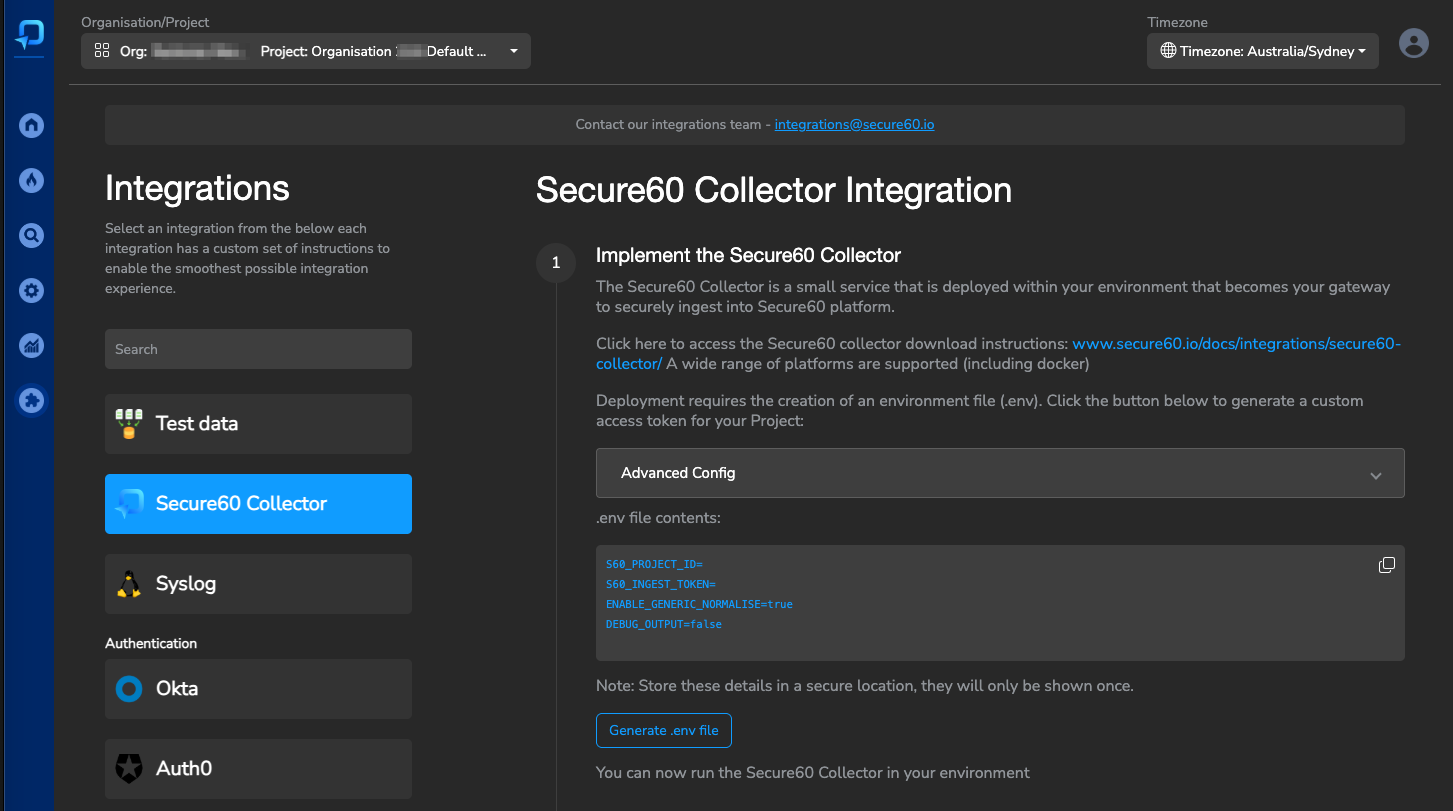
Step 1: Generate Configuration
- Navigate to the Integrations page in your Secure60 Portal
- Select “Secure60 Collector” (or a specific integration like “Syslog” for pre-configured settings)
- Click “Generate Configuration” to create your environment file
Your generated .env file will contain:
S60_PROJECT_ID=YOUR_PROJECT_ID
S60_INGEST_TOKEN=YOUR_TOKEN
ENABLE_GENERIC_NORMALISE=true
Step 2: Deploy the Collector
Recommended: Docker Deployment
docker run -i --name s60-collector \
  -p 80:80 -p 443:443 -p 514:514 -p 6514:6514 -p 5044:5044 \
  --rm -d --env-file .env secure60/s60-collector:1.07
Or using Docker Compose:
services:
  s60-collector:
    image: "secure60/s60-collector:1.07"
    container_name: "s60-collector"
    ports:
      - "443:443"
      - "80:80"
      - "514:514"
      - "6514:6514"
    env_file:
      - .env
    restart: 'always'
    logging:
      driver: "json-file"
      options:
        max-size: "50m"
        max-file: "10"
Alternative Deployment Options
- Cloud-Hosted: Available as an add-on to your plan
- Bare Metal: Contact us for custom installation instructions
Step 3: Send data from devices, application and platforms
You can now configure devices (Desktops, Servers, Network devices, Applications) to send their data to the Secure60 collector. This is often achieved via tools such as Syslog that you would configure to output to the IP address of the Secure60 Collector you have deployed.
Once you have configured a device, Login to the Secure60 Portal and view the Overview page to look for the count of Events to be increasing OR view the Search page to see the actual Events you are sending.
We strongly recommend touching base with our Integrations team to for custom advice and onboarding assistance specific to your organisations needs: integrations@secure60.io

Performance and Scaling
- A standard Secure60 Collector hardware specification might be: 4CPU, 4GB RAM, 40GB Disk
- CPU is the main constraint. An approximate hardware sizing to use is 1 CPU can handle 1200 Events per second (Low estimate, actual throughput can be much higher)
- Allow higher volumes of disk to enable buffering of Events when upstream down. Default behaviour is bugger to disk, block when local buffer full to apply back pressure to upstream clients.
Configuration Guide
Portal UI Configuration (Recommended)
The Secure60 Portal provides an intuitive interface for all collector configurations:
- Navigate to Integrations → Secure60 Collector
- Click “Advanced Config”
1. Automatic Field Normalization
The collector automatically normalizes known field names into the Secure60 schema with zero configuration required. This covers:
- Cloud provider logs
- Operating system logs
- Network device logs
- Application logs
Enable via Portal UI or environment variable:
ENABLE_GENERIC_NORMALISE=true # Enabled by default
2. Field Customization
Static Fields
Add consistent values to all events (e.g., environment, application name):
Via Portal UI:
- Navigate to Advanced Config
- Find “Static Fields”
- Enter:
app_name=internet-banking,environment=production
Field Mapping
Normalize field names from different sources:
Via Portal UI:
- Navigate to Advanced Config
- Find “Mapped Fields”
- Enter:
application_name=app_name,user-username=user_name
3. Technology-Specific Normalization
Enable pre-built transformations for specific technologies via Portal UI:
- Linux System Logs
- AWS CloudTrail
- Microsoft 365
- Nginx/Apache Logs
- And more…
4. Advanced Customisation
For complex scenarios requiring custom transformations:
- Create YAML configuration files
- Mount them into the collector container
- Contact integrations@secure60.io for guidance
Example custom transformation:
transforms:
  transform_custom:
    type: remap
    inputs:
      - source_custom
    source: |
      # Custom transformation logic
5. TLS Configuration
The Secure60 Collector supports TLS encryption for secure data transmission. While test certificates are included by default, we recommend using your own certificates in production environments.
Using Default Certificates
The collector comes with test certificates pre-installed. These are suitable for testing but should not be used in production environments.
Using Custom Certificates
-
Generate New Certificates
You can generate new self-signed certificates using OpenSSL:
# Generate certificate and private key openssl req -x509 -newkey rsa:4096 -keyout key.pem -out cert.crt -sha256 -days 365 # Remove passphrase from private key openssl rsa -in key.pem -out key_nopass.pem # Rename files to match expected names mv key_nopass.pem example_key.pem mv cert.crt example_cert.crt -
Deploy Custom Certificates
Mount your certificates into the container using Docker volumes:
docker run -i \
  -v ./example_cert.crt:/etc/vector/example_cert.crt \
  -v ./example_key.pem:/etc/vector/example_key.pem \
  --name s60-collector \
  -p 80:80 -p 443:443 -p 514:514 -p 6514:6514 \
  --rm -d --env-file .env secure60/s60-collector:1.07
Or using Docker Compose:
services:
  s60-collector:
    image: "secure60/s60-collector:1.07"
    volumes:
      - ./example_cert.crt:/etc/vector/example_cert.crt
      - ./example_key.pem:/etc/vector/example_key.pem
    ports:
      - "443:443"
      - "80:80"
      - "514:514"
      - "6514:6514"
    env_file:
      - .env
Best Practices
- Always use valid certificates in production environments
- Regularly rotate certificates before expiration
- Ensure proper file permissions on certificate files
- Keep private keys secure and never commit them to version control
- Consider using a certificate management solution for production deployments
For assistance with TLS configuration or certificate management, contact our integrations team at integrations@secure60.io
6. Buffer Configuration
The Secure60 Collector provides flexible buffer configuration options to optimize performance and reliability based on your specific needs. These settings can be configured through the Portal UI or via environment variables.
Buffer Type
The collector supports two buffer types:
-
Disk Buffer (default):
- More durable but less performant
- Data synchronized to disk every 500ms
- Survives collector restarts and crashes
- Requires minimum 256MB of disk space
-
Memory Buffer:
- More performant but less durable
- Data will be lost if the collector is restarted forcefully or crashes
- Maximum of 500 events by default
Buffer Size
When using disk buffering, you can configure the maximum buffer size:
- Minimum size: 256MB (268,435,488 bytes)
- Default size: 1GB (1,000,000,000 bytes)
Buffer Full Behavior
Configure how the collector handles events when the buffer is full:
-
Block (default):
- Applies backpressure to upstream sources
- No data loss but may cause data to accumulate at the edge
- Ensures reliable delivery at the cost of potential slowdown
-
Drop Newest:
- Drops new events when buffer is full
- Prioritizes performance over reliability
- Suitable when temporary data loss is acceptable
Configuration Methods
-
Portal UI Configuration (Recommended):
- Navigate to Integrations → Secure60 Collector
- Click “Advanced Config”
- Configure buffer settings under “Buffer Configuration”
-
Environment Variables:
INGEST_BUFFERTYPE=disk        # or "memory"
INGEST_BUFFERSIZE=1000000000  # Buffer size in bytes
INGEST_BUFFERFULL=block       # or "drop_newest"
INGEST_LOCATION=https://ingest.secure60.io/ingest/1.0/http/project/  # Custom ingest endpoint
Buffer Configuration Tips
- For high-reliability scenarios, use disk buffering with the “block” behavior
- For high-performance scenarios where some data loss is acceptable, use memory buffering with “drop_newest”
- Monitor buffer usage through the Secure60 Portal to ensure appropriate sizing
- Consider your available disk space when configuring disk buffer size
- The ingest location can be customized for private cloud deployments
Security Features
Secure60 Collector implements comprehensive data masking and hashing capabilities that allow organizations to protect sensitive data before it reaches the Secure60 platform. This solution is applied within your environment, ensuring sensitive information is never transmitted or stored in its original form.
Data Masking and Hashing:
- Ensure sensitive data is protected during collection, storage, and processing
- Comply with privacy regulations and internal security policies
- Maintain data utility while protecting sensitive information
Features:
Secure60 Collector offers two primary data protection strategies:
-
Replacement Masking
- Replaces sensitive field values with X characters
- Supports partial redaction (preserving first and last characters)
- Configurable for full or partial field masking
- Example:
"password123"→"pXXXXXXXX3"(with partial redaction) or"XXXXXXXXXXX"(full redaction)
-
Hashing
- Supports multiple cryptographic algorithms:
- MD5
- SHA1
- SHA2 (SHA-512/256)
- SHA3 (SHA3-256 default, SHA3-512 available)
- Example:
"password123"→"a665a45920422f9d417e4867efdc4fb8a04a1f3fff1fa07e998e86f7f7a27ae3"(SHA3-256)
- Supports multiple cryptographic algorithms:
Implementation:
Data masking can be configured either through the Secure60 portal integrations page or via environment variables in the Secure60 Collector configuration:
# Basic Configuration
DATA_MASKING_ARRAY: ["password", "credit_card", "ssn"]  # Fields to mask
ENABLE_DATA_MASKING_X: "true"                           # Enable replacement masking
ENABLE_DATA_MASKING_HASH: "false"                       # Enable hashing

# Advanced Configuration
DATA_MASKING_ENCRYPTION_ALGORITHM: "SHA3"              # Hashing algorithm
ENABLE_DATA_MASKING_PARTIAL_REDACT: "true"             # Enable partial redaction
URL Parameter Protection:
The masking system automatically protects sensitive data in URL query parameters. For example:
- Original URL:
https://api.example.com/user?password=secret123&token=abc123 - Masked URL:
https://api.example.com/user?password=XXXXXXXX&token=XXX123
Best Practices:
- Use partial redaction for fields where maintaining some readability is important
- Choose appropriate hashing algorithms based on your security requirements
- Consider using a combination of both masking strategies for different types of sensitive data
- Regularly review and update your masking configuration as data requirements evolve
Advanced Configuration Examples
The Secure60 Collector can be extended with completely custom configuration files that are written in YAML.
This enables completely bespoke configurations that support sophisticated ingestion and transformation scenarios.
We strongly recommend working with the Secure60 Integrations team to fast track your custom configuration.
Custom configurations are achieved by mapping .yaml files into the running Secure60 Collector container. Mapping files into specific locations with specific definitions allows the Secure60 Collector to pickup these files and include them in the default running configuration.
This mapping can be achieved in docker via -v or creating a Docker compose file or Kubernetes ConfigMap
Examples of the mapping process include:
- Create a custom configuration file
To achieve this configuration we would create a file called: transform-custom.yaml
The default template for this file is:
  transforms:
  transform_custom_transform:
    inputs:
    - route_core.custom_transform
    type: remap
    source: |

      #Location for custom configuration of events
You would then run docker with the following syntax:
docker run -i -v ./transform-custom.yaml:/etc/vector/transforms-active/transform-filebeat.yaml --name s60-collector -p 80:80 -p 443:443 -p 514:514 -p 6514:6514 -p 5044:5044 --rm -d --env-file .env secure60/s60-collector:1.07
The additional syntax: -v ./transform-filebeat.yaml:/etc/vector/transforms-active/transform-custom.yaml takes a file in your local folder called transform-custom.yaml and inserts it into the docker container in a location that will be picked up and activated automatically.
The running docker conatiner will detect changes to this file and automatically reload, however if you change environment variables you should stop and restart the container to allow the values to be reloaded.
- Enabling a custom transformation
To enable a custom tranformation you select which Events to send into it.
To do this via the Portal UI:
- Navigate to Advanced Config in the Secure60 Collector settings
- Find the “Custom Transform” section
- Configure the following:
- Enable Custom Transform: Set to “true”
- Match Field: Enter the field name to match against (e.g., “source_type”)
- Match Value: Enter the value to match (e.g., “custom_logs”)
Alternatively, via environment variables:
ENABLE_CUSTOM=true
ENABLE_CUSTOM_MATCH_FIELD=source_type
ENABLE_CUSTOM_MATCH_VALUE=custom_logs
This configuration will route any events where source_type="custom_logs" into your custom transformation pipeline.
For assistance with custom transformations or to see more examples, contact our integrations team at integrations@secure60.io
Notes
- To see Secure60 Collector startup debug information, drop the
-dfrom the command line - View debug information
- Enable the .env variable:
DEBUG_OUTPUT=trueto output the Events log just before they are send to Secure60 Ingest endpoint - For deep debug output enable the .env variable:
VECTOR_LOG=debug - Naming of files and source / transformation blocks is important
- Always start an integration input with the name
incoming_ - Always start a transformation with the name
transform_ - Always file map into
/etc/vector/transforms-active/within the container as this location is automatically monitored for files and file changes
- Always start an integration input with the name
- Sending Test Logs
- Send a full file (eg large JSON object):
curl -X POST -H "Content-Type: application/json" --data @./aws-cloudtrail-sample.json http://127.0.0.1 - Send information to Syslog endpoint:
nc -w0 127.0.0.1 514 <<< "Feb 8 14:30:15 server1 sshd[1234]: Accepted password for user123 from 192.168.1.100 port 12345 ssh2"
- Send a full file (eg large JSON object):
Environment File Reference
S60_PROJECT_ID=<YOUR-PROJECT-ID>
S60_INGEST_TOKEN=<YOUR-INGEST-TOKEN>
ENABLE_GENERIC_NORMALISE=true
DEBUG_OUTPUT=false

STATIC_FIELDS
MAP_FIELDS
ENABLE_SYSLOG
ENABLE_CUSTOM
ENABLE_CUSTOM_MATCH_FIELD
ENABLE_CUSTOM_MATCH_VALUE
ENABLE_AWS=false
ENABLE_AWS_MATCH_FIELD=
ENABLE_AWS_MATCH_VALUE=
ENABLE_NGINX_MATCH_FIELD
ENABLE_NGINX_MATCH_VALUE
ENABLE_NGINX=false
ENABLE_APACHE_MATCH_FIELD
ENABLE_APACHE_MATCH_VALUE
ENABLE_APACHE=false
ENABLE_M365=false
ENABLE_LINUX_MATCH_FIELD=
ENABLE_LINUX_MATCH_VALUE=
ENABLE_LINUX=false
ENABLE_CUSTOM_SYSLOG_MATCH_FIELD
ENABLE_CUSTOM_SYSLOG_MATCH_VALUE
ENABLE_CUSTOM_SYSLOG=false
ENABLE_DEBUG_MATCH_FIELD
ENABLE_DEBUG_MATCH_VALUE
ENABLE_DEBUG=false
GCP_PUBSUB_CREDENTIAL_PATH
GCP_PUBSUB_PROJECT
GCP_PUBSUB_SUBSCRIPTION
GOOGLEWORKSPACE_CREDENTIAL_PATH
GOOGLEWORKSPACE_PROJECT
GOOGLEWORKSPACE_SUBSCRIPTION
DATA_MASKING_ARRAY
ENABLE_DATA_MASKING_HASH
ENABLE_DATA_MASKING_X
DATA_MASKING_ENCRYPTION_ALGORITHM